I always wanted to have Koi, but I knew they need a lot of space to swim around. To start out I bought a nice decorative tub from the hardware store, and filled it with water, and put gold fish in it, and left it in the house. The cleaning was definitely a hassle, but I left a Calalily plant in the water, and it seemed to filter/oxygenate the water well enough to keep the fish alive. Of course I had to change the water still, and boy was that a pain. The gold fish started to get big, but one day I changed the water (after spraying some insecticide [Seven]) and the next day they were belly up. It may have been the insecticide on my hands, or it may have been too drastic of a pH change from the water change. I dont know. Well I was going to give up, but I went out and bought two more.
The gold fish were great and all but I really wanted some Koi. After our backyard project (deck/patio) was finished, the boss commanded that a water feature be added. I dug a hole, but a premade hard liner in, and voila. Outdoor Koi pond! -I left the goldfish inside. I did buy a Koi fish, water lilies, a water pump and dumped them in the pond. After a while, I could never find the Koi, because the water got a bit murky. I stopped feeding the little guy (forgot to) for about a month and figured it died. A month went buy and I was happening to look in and saw the Koi swim by. Still alive! I found that, being the herbivores that they are, they live off algae and likely my lili plants.
Living in the Midwest, I realized that the outdoor pond I had was too shallow. I had to either winterize the Koi, or dump them in the big pond in my neighborhood. I opted for the former. I searched the internet for days for ideas on making a indoor koi pond. One great source of inspiration was found on youtube here: http://www.youtube.com/watch?v=IWLFEJ1kFfQ

The Base
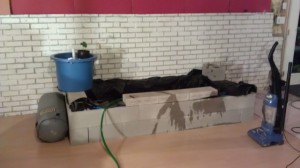
I had to first figure out where I wanted to place the pond indoors. I figured, this part of my basement was great. Next to the walk out if I need to dump stuff out. Also it was an unused space. From what I have read online, the rule of thumb is 2-3 gallons per Koi inch. I devised about a 200 gallon layout, bought the concrete block, and started stacking. I had to make about 3 trips picking up these concrete block. I could have made one out of wood too, but I figured this was the easiest method. I opted not to mortar it together, that way I could move it in the future when I finish my basement. So far nothing has fallen apart yet.
Dropping protective lineing (tarp) and Pond Liner

Self explanatory. I bought some cheap tarp from home depot, and used it to line the bottom and concrete block to protect the soft pond liner. Also it would ideally catch some of the water in the event of a leak.
- I then dropped the pond liner in. Capped it with the concrete slabs, and filled it with water.

Biofilter
From scouring the internet, I found that it is very important to have a biofilter, which helps clear up the ammonia build up from fish waste with the help of beneficial bacteria.

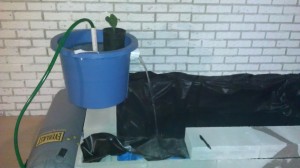
I could have bought one, but for my purposes and for fun, building my own was the path I chose. Luckily I came across this site: http://www.skippysstuff.com/ and created my own version of their biofilter. I think it is working out so far, my water is clear, I dont see any algae, and there is no foul stench.
Up and Running for 3 months

So far the Pond has been up and running for 3 months now (as of Jan 29, 2012). The water is not as pungent, and is relatively clear (at least I think it is). Any other viewers out there please share any comments as well.
I’ve had to clean out the fish waste/dead plant/leftover food debris a few times, which I think helps. More of my cleaning fiasco is detailed in the maintenance section. I have 2 pumps, one that takes water to my home made bio-filter, and one that is a mechanical/bio-filter pump combo. The mechanical filter part gets clogged, and I have to rinse it out every 4 weeks it seems. I need to figure out a way to improve the filtering of the debris. Maybe using a more powerful pump with a mechanical pre-filter. That way I would not have to continually siphon clean the debris out.

I did inoculate the pond with beneficial bacterial 1-2x a week (maybe more). I assume that helped aide the bio-filter kick-start. I didn’t really let my pond cycle very long. Actually maybe only 1 day, but I did use some water from the pond that I had outside (where I brought the 2 koi I had). This may have helped, but then again I probably got lucky. From what I read online you should let the pond cycle a few times and establish the bacterial before throwing the fishies in. My bio-filter does not give off any foul odors, and there does seem to be some algae or at least some green stuff growing along the mesh/media. I really hope I don’t start developing mold in my house. So far, my basement is dry enough (have a walk out) that the humidity is not a real big issue (as far as I can tell).

Not much else is going on yet. Once I clean up around the pond I will try to get some better pictures.


to be continued…


Nice post! If you added water feature than care it with Pondpro2000 so that you could enjoy it long. As the pond liner has the happy task of ensuring that the water stays in the pond and not out into the surrounding area.